I had written this article during last year, and was waiting for it to get printed in Open Source For You . You can read my article here
So, computer vision is growing by the day. I constantly keep coming across amazing and fascinating research papers , uploaded to arXiv. Awesome new algorithms are being developed involving deep learning, geometric or shape primitives, 3D vision, etc. The list keeps going on. However, there’s this parallel movement of everything becoming cloud based. And the browser , being the stairway to that heaven :P , which is why I felt to develop something using TrackingJS.
According to GitHub, tracking.js is a lightweight JS library that offers a variety of computer vision algorithms with HTML5 and JS. Some algorithms implemented here are for colour tracking, face detection, feature descrip tors and the other utility functions.
So let’s get started !
Things Required:
- Browser : This tutorial is w.r.t Chrome . I really don’t know how other browsers will perform.
- Tracking JS library : You can download it github | click here.
- Probably a good JS text editor ( Sublime Text is fine )
I’m assuming basic knowledge in HTML, CSS and JS. This tutorial is aim at a very basic level of the aforementioned languages.
You can refer to the example code on my Github . All the code is present in the src directory ; and the TrackingJS library is present in the TRACKING library.
Basic Computer vision in the browser:
Computations are carried out upon images, with the fundamental unit being a pixel. Algorithms involve mathematical operations on a pixel or a group of pixels. This article addresses a few hackneyed CV algorithms and their ports to a front-end system. To start with, basic concepts like images and canvas are to be understood first.
An HTML image element refers to the <img></img> tag. It is, essentially, adding an image to a Web page. Similarly, to process or display any graphical units, the <canvas></canvas> element is used. Each of these elements has attributes such as height, width, etc, and is referred to via an ID. The computation part is done using JavaScript (JS). A JS file can be included either at the head or body of an HTML document. It contains functions that will implement the aforementioned operations. For drawing any content upon a canvas, a 2D rendering reference called context is supposed to be made.
Here’s how to access images, as well as canvas and context, from JS:
    //getting image, canvas and context
    var im = document.getElementById("image_id");
    var canvas = document.getElementById("canvas_id");
    var context = canvas.getContext("2d");

    //accessing a rectangular set of pixels through context interface
    var pixel = context.getImageData(x, y, width, height);

    //displaying image data
    context.putImageData(image, start_point_x, start_point_y);
** In this tutorial I’ll be covering :**
1. Basic Image Color Space conversion using JS
2. Real - time Color Tracking
3. Face Capture and tag ( Temporary, not permanant storage of face vectors)
4. Feature Detection in Images
Basic Image Color Space conversion using JS:
For this, let’s create a small application involving a live video feed from the webcam and then converting it to gray and thresholding it using RGB threshold values.
First, we will access the webcam. Accessing a Web cam from the browser first requires user consent. Local files with a URL pattern such as file:// are not allowed. Regular https:// URLs are permitted to access media. Whenever this feature is executed, the user’s consent will be required. Any image or video captured by a camera is essentially media. Hence, there has to be a media object to set up, initialise and handle any data received by the Web cam. This ability of seamless integration is due to media APIs provided by the browser.
As seen, there is a video element, a canvas and a couple of buttons to trigger any transform that we want. Thus we write the appropriate Javascript to access the webcam and then, using the context mentioned in above, convert the color spaces.
In the above code, navigator.getUserMedia will be set if the media exists. To get control of media (refers to camera), use the following code:
    navigator.getUserMedia({
            video: true
        },handle_video, report_error );
On the successful reception of a frame, the success_stream handler is called. In case of any error, error_stream is called. The success_stream function has the video stream as input, and will display each frame in the video_frame (HTML video element) .
Any of the button , if clicked, will call it’s respective function. This is seen and mapped in the above JS-GIST.
JS stores an image as a linear array in RGBA format. Each image can be split into its respective channels, as shown below:
var image = context.getImageData(0, 0, canvas.width, canvas.height);
var channels == image.data.length/4;
for(var i=0;i<channels;i++){
    var red_component_pixel = image.data[i*4 + 0];
    var green_component_pixel = image.data[i*4 + 1];
    var blue_component_pixel = image.data[i*4 + 2];
}
For the computation of gray scale images, A gray scale image is one in which all colour components are normalised to have equal weightage. If an 8-bit image is considered, the colour gray is obtained when the number of RGB bits equals 1.
To solve this, there is a simple formula, which creates a weighted sum of pixel values to yield a gray image:
gray[pixel] = 0.21 x red_component_pixel + 0.72 x green_component_pixel + 0.07 x blue_component_pixel'
On applying the above formula to each pixel, split into its components, one gets an equivalent gray pixel.
For computation of binary and inverted images : A binary image is in black and white (BW). The conversion of an image from colour to BW is done through a process called thresholding, which classifies each pixel as white or black based on its value. If the value is greater than a particular threshold, it will be set to 255, else 0.
if(red_component_pixel > threshold_red &&
    green_component_pixel > threshold_green &&
    blue_component_pixel > threshold_blue){
    //make pixel == white
    image.data[pixel] = 255;
}else{ image.data[pixel] = 0; }
Just as we have negatives for a photograph, similarly, the inversion of colour space of any image converts all pixels into a negative. This can simply be done by subtracting each pixel value from 255
The logic is well commented within the GIST. So please refer the Gist.
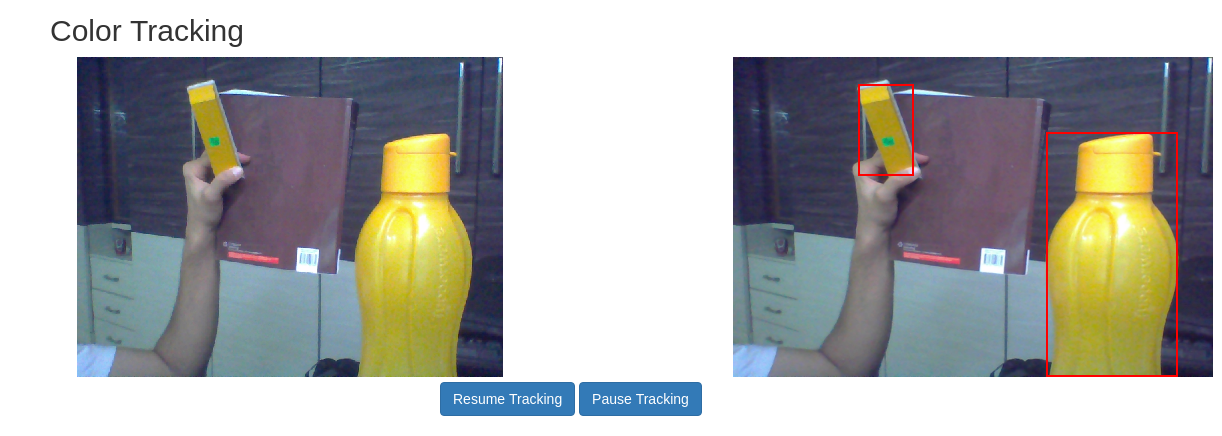
Real Time Color Tracking
For implementing this, we’ll use the tracking.js library.
In your head tag of the HTML document, include the following script
*
From now, for the HTML templates, please refer the source@github. I’ll continue with explaining the javascript part. The process of declaring a video object and capturing frames in javascript remains same as above. To start using TrackingJs, we declare a color-tracker object.
To initialise a colour tracker, first use the following commands:
    var myTracker = new tracking.ColorTracker(['yellow']);
    myTracker.on("track", color_tracking_callback);
    var mT = tracking.track("#myVideo", myTracker);
In the above code snippet, color_tracking_callback is a callback which will receive a list of all possible locations where the given colour is present. Each location is a rectangle object, comprising attributes which are ‘x, y, width and height’. x and y are the starting points of the rectangle.
The natural action for tracking is to make a bounding box around the region we are interested in. Therefore, the boundingBox function plots a rectangle around the region of interest. Context variable is used here to perform any canvas drawing methods. context.stroke() eventually prints it on the canvas.
    function color_tracking_callback(list_rect){
        list_rect.data.forEach(drawBoundingBox);
    }

    function drawBoundingBox(rect){
        context.beginPath();
        context.strokeStyle = "red";
        context.lineWidth = "2";
        context.rect(rect.x, rect.y, rect.width, rect.height);
        context.stroke();
    }
Tracking.JS also provides with a trigger to either start or stop the streaming process.
Incase you want to track a custom RGB range of colors, you can refer to this snippet below. As seen, the input to a colour tracker is a list of probable colours (e.g., [yellow]). As the definition suggests, a colour tracker must be able to track colours. Tracking.js provides a method registerColor that handles user-specified custom colours.
tracking.ColorTracker.registerColor('<color_name>' , callback_color);
The callback_color callback will have input arguments as red, blue and green values. Since this is a custom colour, one has to define the RGB ranges. If the RGB argument meets the range,the function returns true, else it’ll return false.
    function callback_color(r , g, b){
        if(r > r_low && r < r_high && g > g_low && g < g_high && b > b_low && b < b_high){
            return true;
        }
        return false;
    }
Here, r_low, r_high, etc, refer to the lower and upper bounds of the threshold values, respectively. Having registered the colour, one can simply append color_name to color_list in tracking.ColorTracker (color_list).
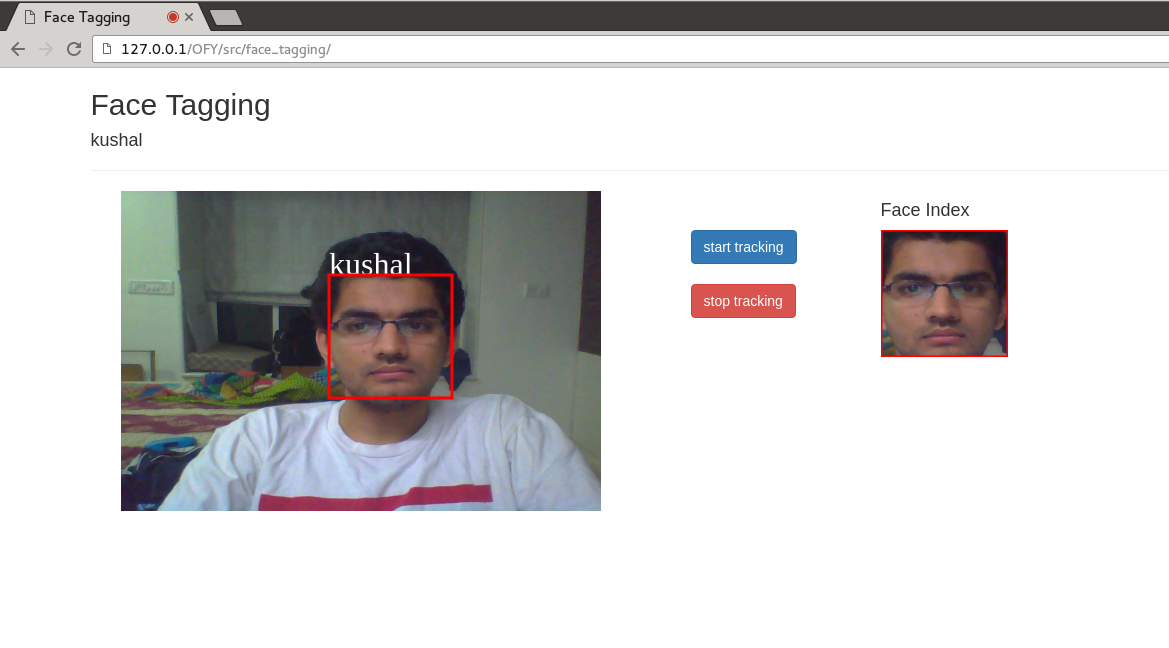
Face Capture and tag ( Temporary, not permanant storage of face vectors)
Face detection in Tracking.js uses the Viola-Jones Framework. You can look it up in the documentation. It also has the popular opencv_haarcascade in the repository’s utils folder.
As seen in the previous examples, this code involves the same, video capture and processing function blocks. What is added is the new tracking.js face detector.
    var face_tracker = new tracking.ObjectTracker("face");
    // tuning params
    face_tracker.setInitialScale(4); //set initial scale for featureblock scaling
    face_tracker.setEdgesDensity(0.1); //check to skip edge
    face_tracker.setStepSize(2); //block step size
    // tracker on video
    var mTracker = tracking.track("#myVideo", face_tracker, {camera:'true'});
    face_tracker.on("track", handle_faces);
face_tracker is actually an object detector (uses the viola jones object detection framework).
Make sure, to run the face detection, the following js includes must be made
-
TRACKING/build/tracking.js
-
TRACKING/build/data/face-min.js
One can refer the documentation to know about all the methods supported by the object tracker. Feel free to experient with different values as well. Default value’s are mentioned in the block.
Once a face is detected, a JS prompt is created to enter the name for the person.
**Note : This is all happening in a real time video . Hence , there may be multiple occurences that a prompt for the face pops up, if the face previously detected undergoes disturbance/disappears from the frame, etc. **
    function handle_new_faces(data){
        imcanvas2.clearRect(0, 0, canvas2.width, canvas2.height);
        for(var data_cx in data){
            var tmp = data[data_cx];
            name = prompt("enter name");
            document.getElementById("p_name").innerHTML=  name;
            drawBoundingBox(tmp);
            updateIndex(tmp);
        }
    }
This will create a face-tag for a single person and continue to track that person. Incase if anyone wants to implement a multi person ‘tag n track’, what one can do is detect all possible faces in a video frame, and tag each face with it’s features. Once that is done, in the next frame, compare the newly detected faces with the stored features, minimizing the euclidean distance between the previously and newly detected facial features
Features extraction and matching
In simple terms, any significant discernible parts of the image can be defined as a feature. These can be corner points, edges or even a group of vectors oriented independently. The process of extracting such information is called feature extraction. Various implementations exist for feature extraction and descriptors, such as SIFT, SURF (feature descriptors) and FAST (corner detection). Tracking.js implements BRIEF (Binary Robust Independent Elementary Features) and FAST (Features from Accelerated Segmentation Test). Input to the system is first a gray image. The following code extracts corner points (points of interest) based on FAST.
    var gray = tracking.Image.grayscale(input_image, width, height);
    var corners = tracking.Fast.findCorners(gray, width, height);
Each feature point can be referred to as a location. But to be able to perform any operations, these locations are converted into descriptors, which can be considered as a list of vectors that define a given feature. Comparison operators are applied upon these vectors. To find descriptors, tracking.js uses the BRIEF framework to extrapolate descriptor vectors from given feature points.
var descriptors = tracking.Brief.getDescriptors(gray, width, corners);
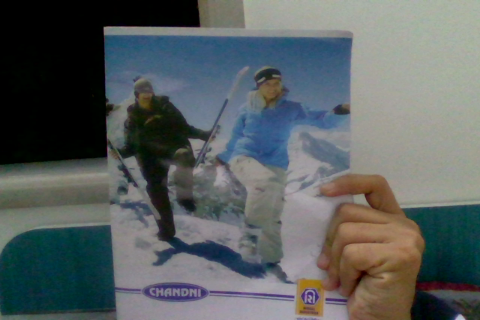
Having got the points of interest from an image as well as their descriptors, we can design a scenario wherein one can track based on templates. Given a video frame and a fixed image, features can be used to match and identify where the fixed image can be located. However, there can be false positives.
    var matches = tracking.Brief.reciprocalMatch(corner_scene, descriptor_scene ,corner_target, descriptor_target);
    // calculates the matching points between the scene and the target image.
    matches.sort(function(a, b){
        //matches can be further filtered by using a sorting functin
        // Either sort according to number of matches found:
        return b.length - a.length;
        // or sort according to confidence value:
        return b.confidence - a.confidence
    }
The matches obtained can be sorted on the basis of their length, i.e., the number of matches obtained, and on their confidence value, as to how well the points match. Having arranged the matches, efficient matching of the target template image and the scene image can be carried out. It is simply a task of graphics now. Just iterate over the two arrays and mark the appropriate feature points on the canvas, as follows:
        function plot_matches(matches){
            for (var i = 0; i < matches.length; i++) {
                var color = "red";
                context.lineWidth = "2px";
                context.fillStyle = color;
                context.strokeStyle = color;
                context.beginPath();
                context.arc(matches[i].keypoint1[0], matches[i].keypoint1[1], 4, 0, 2*Math.PI);
                context.stroke();
            }
        }
The above function plots the matches only for the scene image, since the reference context is made with respect to one canvas element. For plotting matches on the target template image, a context reference has to be made to its respective canvas element.
Here are some cool experiments that I did with tracking.js
Oringal webcam image
Grayscale conversion
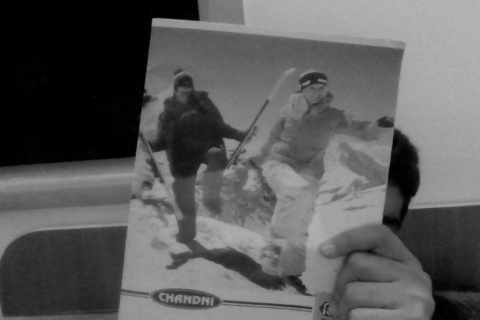
Binary Conversion

For complete implementation , please refer to the article in Opensource For You as well as the Github link.
Also refer the Tracking.JS website. It is very well documented , with awesome examples.
So, using tracking.js, one can develop browser based computer vision applications with much ease.
References:
[1]TrackingJS.
[2]Developer Mozilla CanvasRenderingContext2D API.
[3]Developer Mozilla Media API
[4]Exploring Front-end Computer Vision - Open Source For You